| Home |
| Daf history |
| Our Daf project |
| Daf Literature |
| Daf technical info |
| FAQs |
| Daf links |
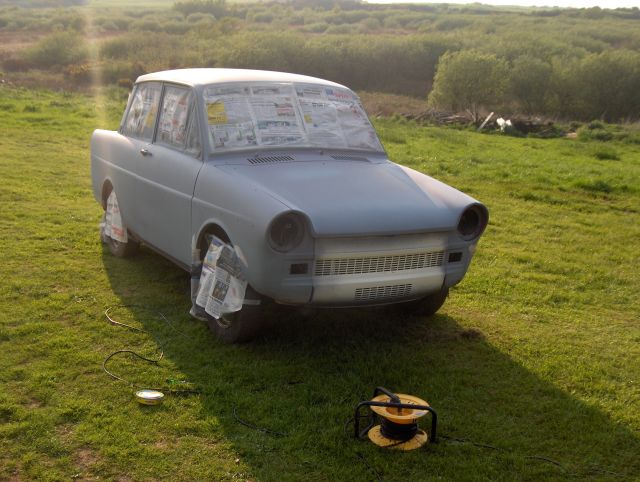
20th April 2008
Progress is stalled for the moment by the Welsh weather. Cold winds and drizzle just don't work for outside body repairs! Before the curent cold snap, we managed to finish the inside of the floorpan, except the driver's footwell which is waiting for the seat to come out. Having no separate storage, we can't do that one until the passenger seat is back in place!
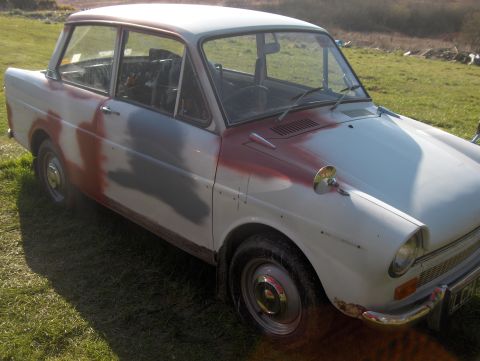
We've also got a good part of the driver's side bodywork ready for rub-down and paint. The areas still to do are the corners of the front and rear wings behind the bumpers, and the rear edge of the front wing where it had been previously filled. The car has now been re-modelled as the Daf Dalmation and there's been a (joking, I hope) suggestion of just clear-coating it as it stands!
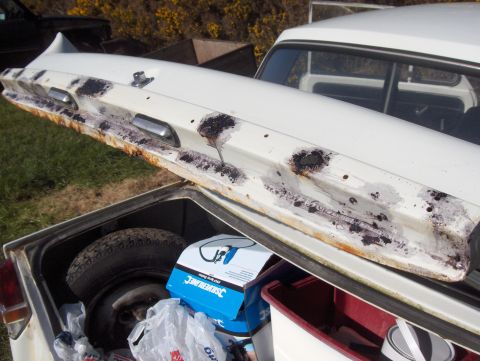
Next area to attack will be the bootlid. We've removed the loose rust and found that it's basically sound, which is an unexpected bonus. Once the rust is stopped, filler and a fibreglass lip should see it good for another few years - hopefully time to track down a replacement lid!
We've also made a start on working out how to power spray kit and the odd power tool - a genereator seems obviouls, but we're looking as well at these newfangled camping inverters. They're a lighter and quieter approach, given that it's on someone else's land, but a little less flexible for possible future uses. I spent yesterday rigging one out of an old computer UPS which is good for 500w - enough to try the idea with a palm sander, but probably not quite meaty enough for spraying.
Still, it's all progress on days that we can't actually attack the car!
22nd April 2008
Finally, the weather cleared enough to get some more done. Only, life got in the way so didn't manage to get to the car until gone 4pm! Still, with the sun out and the wind dropped, we got a fair chunk done. Driver's wing mirror finally agreed to being unbolted and the bonnet hinges also "just came off in me 'ands, guv". The ex-UPS inverter worked a treat for power sanding and an el-cheapo 5 litre garden sprayer has proved ideal for wash-down during sanding. Between them they've made a huge difference to the rate (and arm-ache) of work.
The top of the driver's wing along with most of the bonnet, the driver's rear quarter panel and the driver's door are almost ready for paint now.

Plan for next visit is for Sian to start attacking "that" bootlid while I get on with the wing corners (so bumpers off as well) - at this rate we'll have successfully turned a fairly tidy looking Daf into a pile of disconnected parts in another week or so!
23rd April 2008
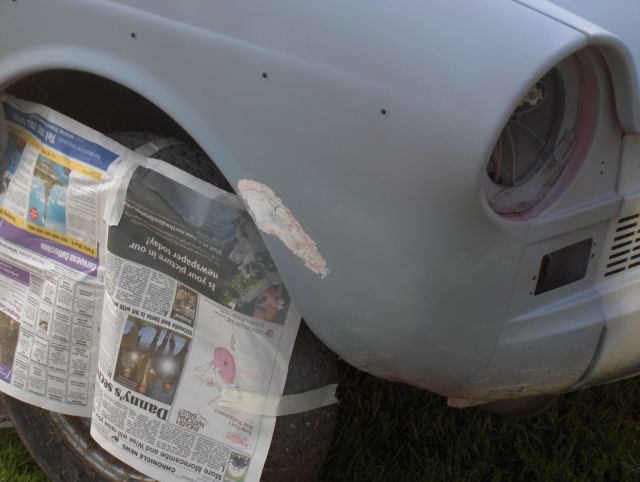
Ok, so went in a slightly different direction today. Instead of starting the under-bumper stuff, I got the bootlid off and left Sian happily making holes in that while I started to tackle the missing lower corner of the front wing.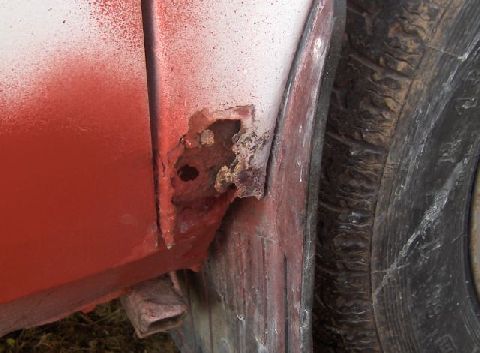
It's non-structure, so it gets the ally mesh treatment
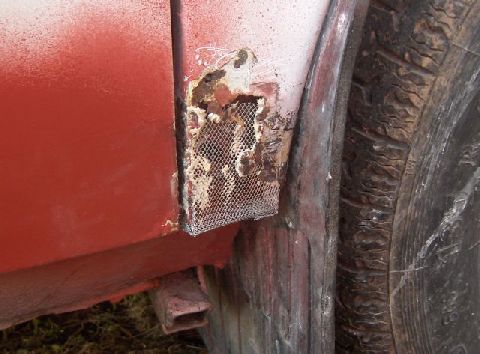
followed by a good dose of Kurust and some nice new filler
I prefer ally mesh to fibreglass for this sort of area because it's so much cleaner to work with, and so much easier to shape for simple, flat, surfaces like this. It's also a lot easier to form sharp edges with!
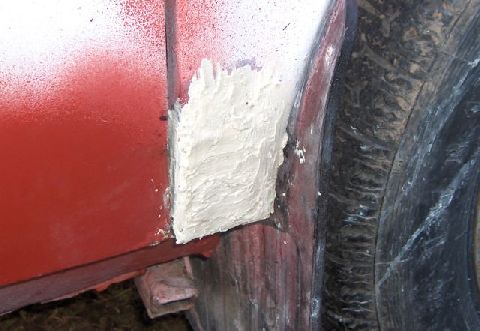
The bootlid is ready for filler, but it was getting late so no pics at the moment. But it's all been dug out, and Kurusted overnight so should be back in shape in no time!
24th April 2008
Got another hour or so done this evening, with Sian having her first experience of body filling. I showed her how to mix it and left her to get on with the boot lid. One less "nasty" job for me!

She did a cracking job, I've seen people put paint straight over worse than this - not that we'll be doing that here!

On a trial fit, the basic line to the body is also good, so she can expect to be doing a bit more as we go, methinks.....

Other than that, I got on with the front wings. Pics will follow when they're a bit more presentable.
5th May 2008
Today was the first time in a week that the weather's allowed anything to be done, but it's set fair for a few days so hope to play catch-up this week.
Now have all the holes identified, rust treated, and filled which is good, but doesn't really feel like progress. The un-finished filler makes it look a lot tattier than when we first saw it so it sort of feels like we've gone backwards! Hope to put that right over the next couple of days - if things go to plan it'll be completely primed and ready for paint by Wednesday.
Most of the bits that need to come off are off - with the exception of the door handles (for access) and the rear number plate - for some reason it's been pop-rivetted on rather than screwed so will need to drill them out. Sian has also got the driver's floor primed up ready for top-coat and once that's done the interior can go back together. It'll be nice to have two front seats again!
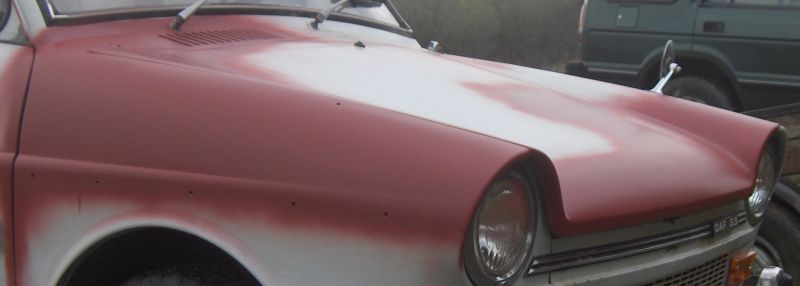
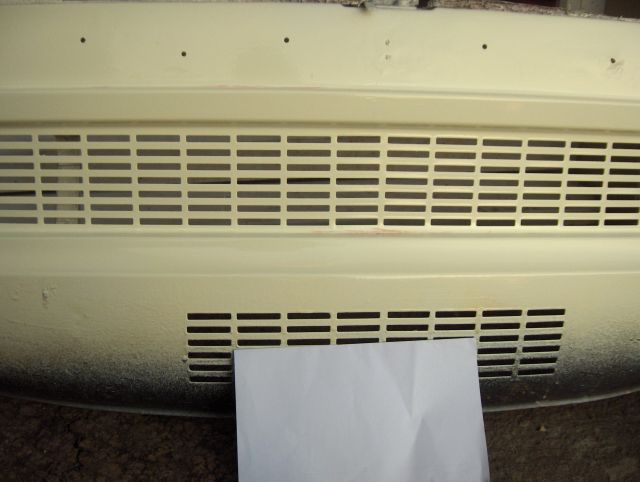
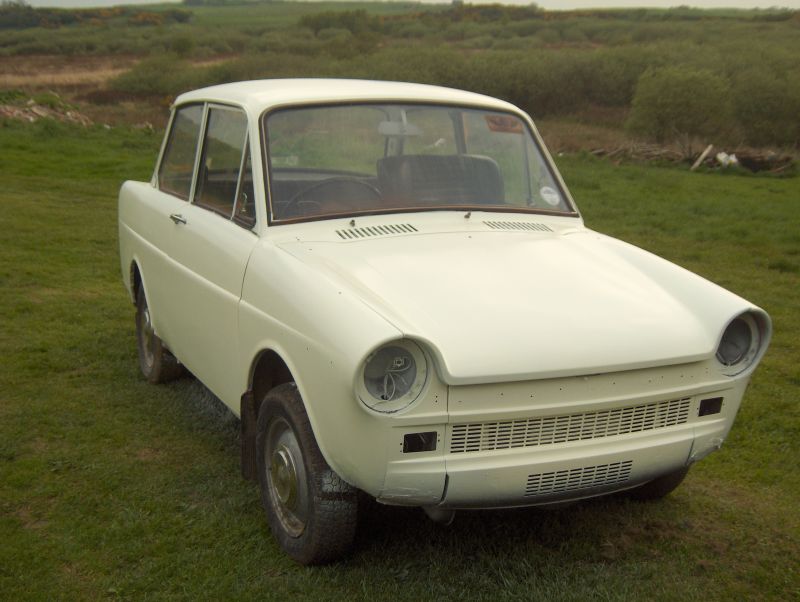
The grill also came off today - partly because it was easier to work on like that but, mainly, because it'd fit in the "working" car to bring home and paint. We now know how the paint will look in use - the white paper in the photo is for colour reference. It's not perfect, and the primer has bled through in a couple of places, but it's nice to have a complete panel that doesn't look 3 shades of rust stain! Below the bumper line (the bottom part with the second grill) will be undersealed again once it's finished - not original but much more practical against stone chips.
Oh, we also discovered that the panel for sliding into the grill when it's cold was in the boot - hadn't noticed it and assumed it was missing!
5th May 2008
Another few hours put in today - a little less than hoped for but productive none the less.
Mostly continuing the dismantling and getting primer on to the parts that are ready for paint. But also tackled the rust spots round the boot hinges / rear screen and started on the n/s rear arch. The driver's side is now just about ready for paint, the only bits left are the final smoothing of the wing corners (the bits that are still white)
The n/s still has a bit to do, but will hopefully have caught up by the end of tomorrow
Then it's just the boot lid to tidy up, and the top-coat should be going on. Weather and other life-stuff permitting, it could be done this week!
8th May 2008
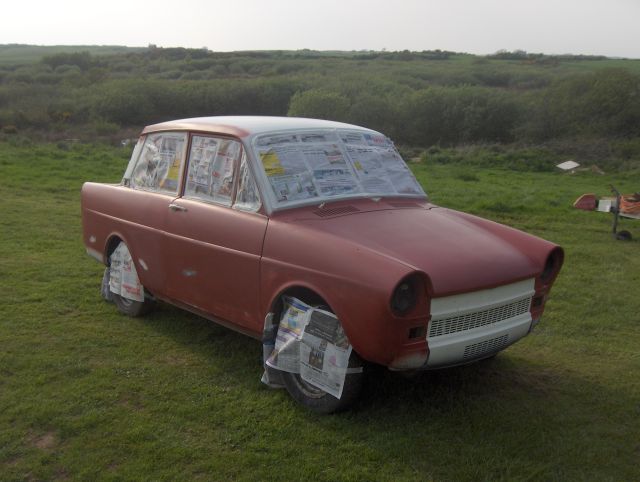
Well, spray day finally arrived! With the remaining prep and actually getting the paint on it was a non-stop 8 hour shift in serious sunshine, but well worth the melting feeling!
The Ł30 HVLP sprayer lived up to it's price-range with a slightly unreliable delivery rate which has caused a run or two. Nothing that won't rub out though. The bigger problem was a couple of patches where one of the previous paints decided to react with the grey cellulose primer from underneath 4 coats of cellulose-compatible red-led! As everything was set up and ready to go, all we could do was wipe off the goo it created and spray anyway. Again, nothing that can't be tidied up once it's properly hardened.
24th May 2008
Not much time for updating lately as I've been concentrating on the problem of providing 12v electrics in a 6v car - without that we either have no music, or an antique 6v medium / long wave radio. That is simply not an option! But more of that in a bit.
Reassembly of the bits that came off for painting is coming along steadily. We've decided to put the black underseal line back at the bottom of the doors. That was partly to get over some odd paint effects and partly because, with the front and rear wings done, it just didn't look right having the bit in the middle missing! Anyway, it's an authentic 70's look - at least, it is remembering all of the previous 70's rust buckets I've driven in the past....
I've also noticed that the rear shock absorbers are a little worn. To be more accurate, they just don't work at all, so we've got to try and track down some to fit. Apparently Monroe still do some the right size and fitting, but they don't list them for Dafs, so will have to get one off next week and get it matched.
On the plus side mechanically, it's had an oil change to semi-synthetic which has virtually stopped the smoke from the exhaust. We have brake shoes ready, and fresh brake fluid, so will be aiming to have a serious "mechy" day in the near future. If it all goes well, could be looking to try for an MOT around the end of June.
So, back to the electrics. One way would be to update the car to 12v, but that means a lot of new parts and detracts from its originality. So, the alternative is to arrange a "modern" 12v supply from the exiting 6v system. With a little digging round the net, and a little experimentation blowing up old computer supplies, I've come up with the circuit below. It's not all that efficient as switching supplies go, but it can output plenty of power and runs nice and cool.
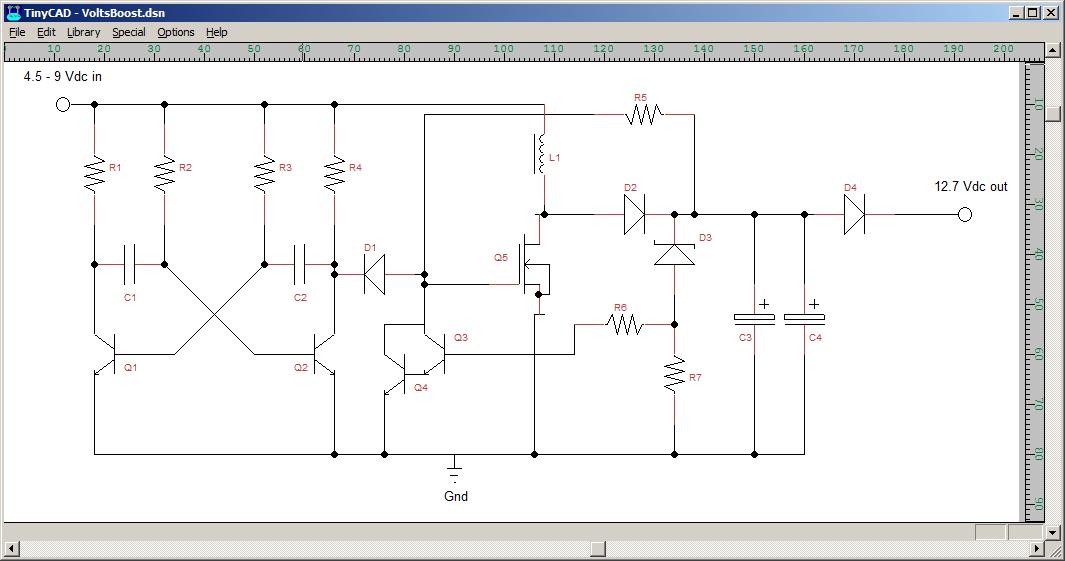
I even went as far as building it on a "proper" printed circuit board instead of my usual playing with electronics using scraps of used veroboard and lots of wire!
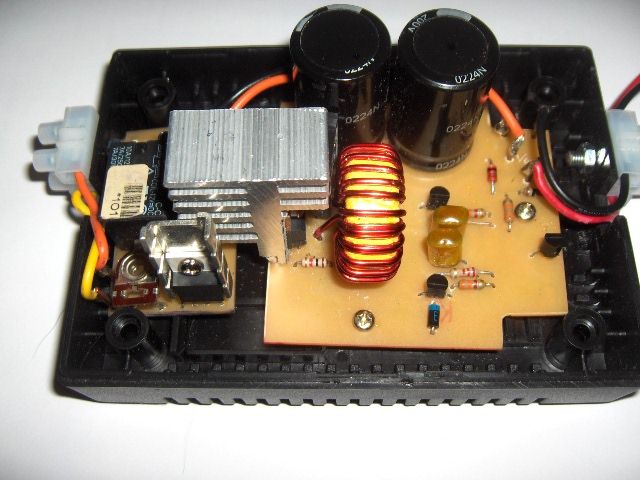
The photo above is slightly out of date - managed to remove the need for the separate voltage regulator at the lower left, which saved a lot of heat output. It'll be wired up to a small sealed lead acid battery so limited 12v will be available with the ignition off to keep the clock running. Now all I have to do is work out where to fit it all.
31st May 2008
Haven't really had a chance to do much the past week - yet again, the Welsh weather decided it was winter. So have been busy with getting stuff ready for when we can go down again instead. The main thing has been a bit of tin-bashing so there's actually somewhere to put a radio after making the power supply for it. Don't want to cut holes in the dash, and probably couldn't find a space big enough anyway, and a normal "under dash" mount doesn't have space for extras like a clock or switches for any other add-ons we might want (intermittent wipers springs to mind....)The solution? One side off an old PC case, an hour or so of cutting and bending, and we now have a custom made centre console:
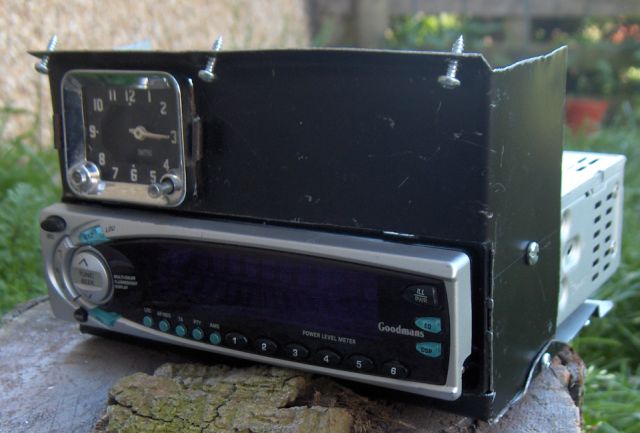
It needs repainting, and may do a light fill to hide the gaps, or then again may not! But it holds the essentials, and gives a mounting area for a few extra goodies if needed. It will also act as a little extra support for the centre of the under-dash cardboard shelf. Debating whether to fit it yet, as the dash has to come out to adjust the windscreen wipers (!!!!) but it's only 5 screws so may get a trial fit later today before I start dismantling the interior again.
6th June 2008
The stereo is now fitted, wired up and working. There's a small problem of where to put the aerial - the wings have too much slope for the one we got but I don't fancy getting behind the headlining to fit a roof one. Maybe a wing-mounted whip will be the way forward? The speaker wires also need lengthening. It's only a small car, but 3 metres of lead won't quite reach the rear shelf without lifting off the floor!
The engine is also now equipped with electronic ignition. It had to be a home-build because of the 6 volt system but runs fine and doesn't seemt to get too hot (yet). Itr's also easy to switch back to conventional if there ever is a problem.
Sian has started cutting back the paint and has demonstrated an unexpected talent for using 1200 grit and rubbing compound! The boot trim is also back in place so it's starting to really feel like a complete car again.
On the mechanical side, a pair of good used shocks are on their way to us from Holland. Many thanks to Danny at dafhobby. He barely charged more than the postage - working it back from the total, I reckon he's only charged about a fiver each for the parts themselves!
Things may slow down a little now, as the Teenager is back for the summer from tomorrow but an MOT by the end of June is definately looking possible, at which point I'll have to negotiate with Sian about her ruling that I can't put it on road till she passes her test. It needs to be run-in, after all ;-)
21st June 2008
A quick update today. The shock arrived, are fitted and working well. The play in the steering rack is also sorted - full story, with pics, here. Having just typed in that lot, not much more to say on here!
24th June 2008
The steering rack is now fitted and spot on, but half the dashboard has fallen apart! The wipers needed sorting out, which meant removing the instruments, and while that's being done I've taken the chance to remove and service the speedo. Full "HowTo" on that is on the new HowTo pages
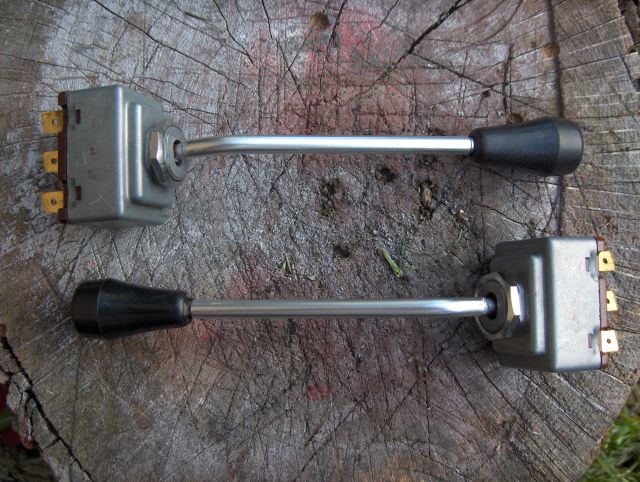
I've also removed, cleaned and painted the dip switch and indicator switches because their stalks were looking a little sorry for themselves. Originally they had a sort of metal-coloured PVC coating on them but they'd rusted underneath and it was entirely missing on the indicator switch. Quick wirebrushing and a few coats of "chrome" spray soon had them looking presentable again!
Other than that, the driver's door now stays open on it's own and I'm starting to seriously think about that MOT booking in the next few weeks. It's suddenly all coming together!
16th Nov 2008
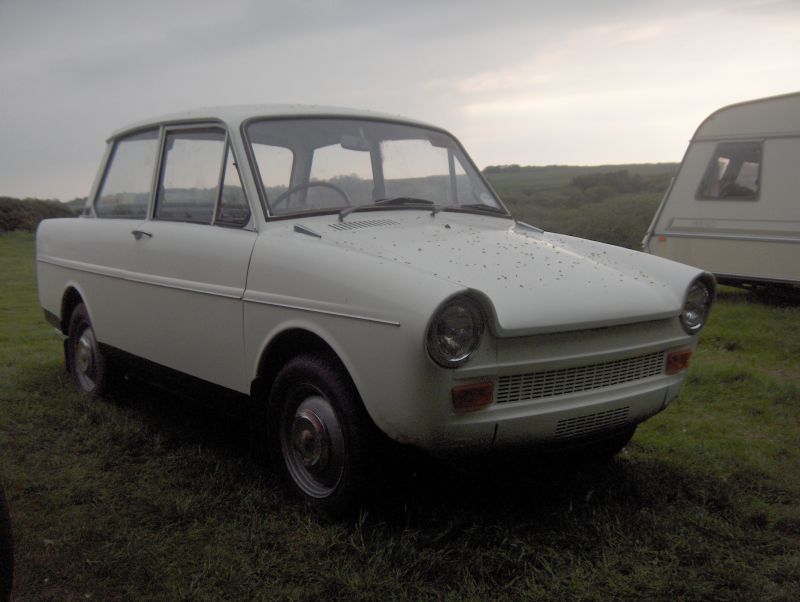
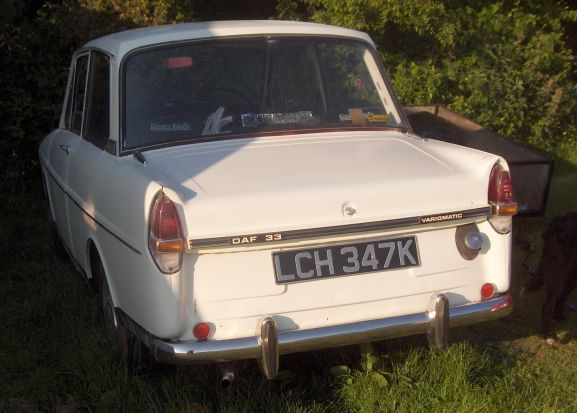
There's been a big gap on here as life overtook any updates, though not progress on Betty (yes, she has a name now!). So, where have we got to?Betty is now fully road legal, having passed her MOT with flying colours (and a just-legal handbrake) back in July. We haven't done many miles in her yet but what we have done has left us with grins that last for hours.
The bodywork is showing a few problems due to the prep and spraying being done out in the open. It's a pity that it wasn't quite right first time, but that was maybe a little much to hope for with all the enforced breaks for Anglesey rain between primer and top-coat! At least it's given a sound base, in a known colour, for us to work on any bits that start to show problems over winter.
She now has halogen headlamp bulbs (6 volt conversion ones) fitted at Ł14 the pair, which have improved lighting considerably. I hope soon to re-wire them to an under-bonnet relay because there's a small voltage drop in the system which is preventing them reaching their full brightness (although they're still a lot better than the originals!). They're a higher wattage than the originals so fitting a relay will take any excessive load off the switch as well - would rather spend a fiver on a relay than try to source a new switch in future!
Other electrical work finished include final wiring of the clock and a back-up battery for the radio, as well as fitting an intermittent wipeer system. The rotary switch / washer pump arrangement isn't exactly convenient for "flicking" the wipers on and off in drizzle so an intermittent system to a switch on the centre console solved any future switch problems there.
Mechanically, the main bits that have been done are replacement of the rear brake shoes and front brake cylinders and shoes. The difference in braking is startling and, at a total parts cost of about Ł37, well worth it. Compare and contrast with a full brake service on anything modern......
Finally, we're starting to get a picture of fuel consumption. Over about 250 miles since we got her, she's been averaging around 28 miles per gallon. Considering that a gfood amount of fuel has been used during tuning work, and running her round the field for the fun of it, that's a hopeful pointer to excellent economy to come!
Guess now, the order of the day is to sit back, relax, and enjoy the miles until the next bit of work is due!